DIY Mastery: A Step-by-Step Guide to Garage Door Spring Replacement
When faced with the necessity of garage door repair Brampton, particularly the daunting task of spring replacement, many homeowners might feel inclined to seek professional help. However, with the right guidance and a careful approach, replacing a garage door spring can be a manageable DIY project.
In this detailed guide, we will walk you through the step-by-step process of replacing the spring in your garage door, empowering you to take control of your home maintenance.
Understanding the Importance of Garage Door Spring Replacement
The springs in a garage door play a pivotal role in its smooth operation. Over time, these springs can wear out, break, or lose tension, necessitating replacement. Prompt garage door spring replacement not only ensures the continued functionality of your garage door but also contributes to the safety of your home.
Types of Garage Door Springs
| Spring Type | Characteristics | Common Lifespan |
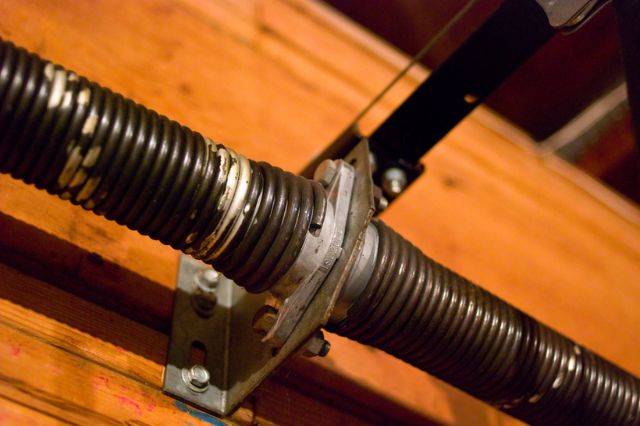
| Torsion Springs | Mounted above the garage door; offers precise and smooth control | 10,000 to 20,000 cycles |
| Extension Springs | Positioned on both sides of the door track; provide counterbalance | 10,000 cycles or more |
Step-by-Step Guide to Garage Door Spring Replacement
Note: Before attempting garage door spring replacement, ensure that you have the necessary tools, safety equipment, and a clear understanding of your garage door system. If in doubt, consult a professional.
Safety First
- Disconnect the garage door opener and lock it in the closed position to prevent accidental opening.
- Put on safety glasses and gloves to protect yourself from potential injuries.
Identify the Spring Type
- Determine whether your garage door has torsion springs or extension springs. This information is crucial for selecting the appropriate replacement springs.
Measure the Existing Springs
- Measure the length and diameter of the existing springs to ensure accurate replacement. Note any color codes or markings on the springs.
Release Tension (Torsion Springs)
- If you have torsion springs, use winding bars to release tension. Insert the winding bars into the winding cone and carefully unwind the springs.
Disconnect and Remove the Old Springs
- For torsion springs, disconnect them from the center bracket and slide them off the torsion tube.
- For extension springs, release the tension and disconnect them from the pulley system.
Install the New Springs
- Slide the new springs onto the torsion tube or secure them to the side of the door track.
- Wind the torsion springs using winding bars in the opposite direction from the unwinding process.
Reconnect the Springs (Extension Springs)
- For extension springs, reconnect them to the pulley system and adjust the tension by relocating the S-hook to a different hole.
Test the Door Balance
- Manually lift the garage door to check its balance. The door should stay in place when lifted halfway. If not, adjust the spring tension accordingly.
Secure and Test
- Ensure all components are securely attached and tightened.
- Reconnect the garage door opener, and test the door’s operation in both manual and automatic modes.
Perform Routine Maintenance
- Apply a silicone-based lubricant to the springs, rollers, hinges, and other moving parts.
- Conduct regular visual inspections to identify any signs of wear or issues.
Additional Tips for Successful Garage Door Spring Replacement
Purchase High-Quality Springs
- Invest in high-quality replacement springs from reputable suppliers. Quality springs contribute to the longevity and reliability of your garage door system.
Follow Manufacturer Guidelines
- Adhere to the manufacturer’s guidelines and specifications for your specific garage door and spring type. This ensures compatibility and safe installation.
Use the Right Tools
- Utilize the appropriate tools for the job, such as winding bars, vise grips, and safety equipment. Using the wrong tools can lead to accidents or damage.
Seek Professional Help if Unsure
- If you encounter challenges or uncertainties during the process, don’t hesitate to seek professional assistance. Garage door spring replacement can be dangerous without the right knowledge and experience.
Balance and Alignment Matter
- Achieving proper balance is crucial for the smooth operation of your garage door. Imbalanced springs can lead to excessive wear and tear.
Consider Upgrading the Entire System
- If one spring has failed, the other may not be far behind. Consider replacing both springs to ensure uniform wear and balance.
Educate Yourself on Garage Door Safety
- Familiarize yourself with garage door safety guidelines. Understanding the potential risks and safety measures is essential for a successful DIY project.
Keep Children and Pets Away
- During the replacement process, ensure that children and pets are kept away from the garage area to prevent accidents.
Empowering Homeowners in Garage Door Maintenance
Replacing the spring in your garage door might seem like a formidable task, but with the right knowledge and precautions, it can be a manageable DIY project. By following this detailed guide and incorporating additional tips, you can take control of your garage door repair needs, contributing to the longevity and safety of your home.
Remember, if you ever feel uncertain or uncomfortable with any aspect of the process, it’s always wise to consult with a professional for assistance.